Intro
As I am starting to take a turn of interest into malware analysis and development, I was required to understand what the Windows API really is. So this post is basically my notes on what windows api is and a few examples of it.
Was exactly is an API
When you use a Windows application, have you ever wondered how it seamlessly interacts with the operating system? The magic behind this interaction is the Windows API. Generally, an api allows for two pieces of software to interact upon another. When it comes to programming, it allows your code to interact with the windows operating system.
Let’s dive into what the Windows API is and why it’s crucial for software development on the Windows platform - but also for red teamers, threat actors and blue teamers as well.
The functionality of the Windows API
The Windows API, or Windows Application Programming Interface, is an extensive collection of functions and procedures supplied by the Microsoft Windows operating system that utilizes memory addresses to access resources, manage memory, pass parameters to methods and much more. Imagine it as a toolkit that enables software developers to build applications capable of interacting with the Windows environment. For instance, tasks such as displaying content on the screen, modifying files, or querying the registry can all be accomplished through the Windows API. Microsoft provides thorough documentation for the Windows API, which you can explore here.
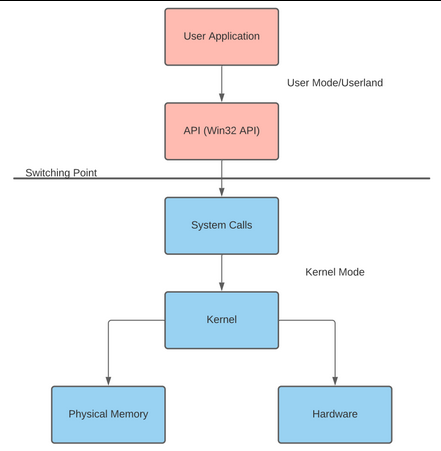
Basically, when an application needs to perform an operation, it uses the Win32 API, which translates the request into SYSCALLs. These SYSCALLs are then executed by the kernel to make the necessary changes or perform the desired actions. We can see an overview of this process in the following diagram:
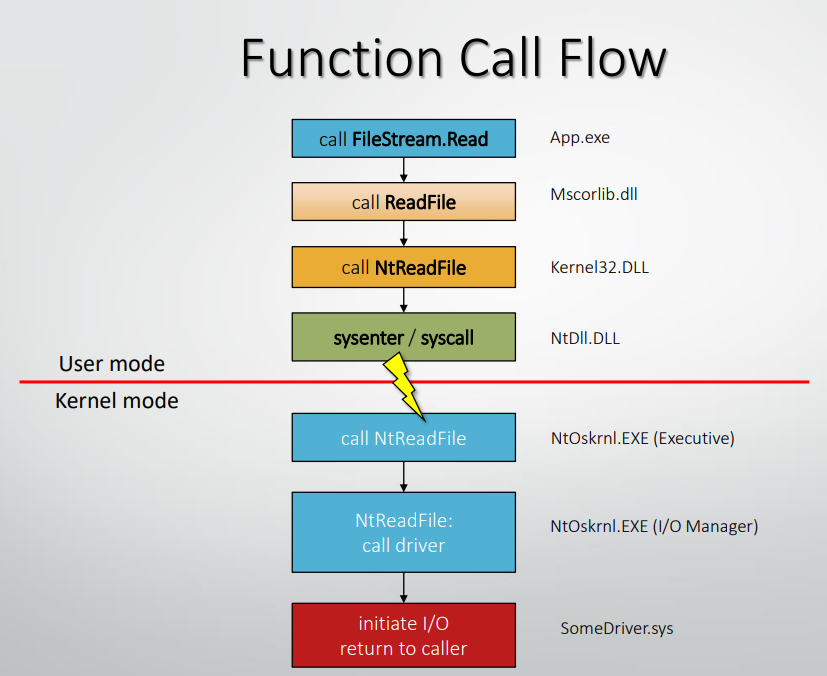
More specifically and for giving an example, the function flow of the calls made by a program that just wants to use the FileStream.Read method would be the following:
Windows Jobs
A Windows Job is directly supported by the Windows API through functions that allow you to create, manage, and monitor job objects. These job objects are part of the Windows OS’s resource management capabilities. In simpler terms, a job is a kernel object that is responsible for managing one or more processes that run on the system. Functions like CreateJobObject and OpenJobObject are part of the Windows API and provide the necessary tools to implement job management.
- CreateJobObject: This function is part of the Windows API and is used to create a job object. It provides a handle to the newly created job object, which can then be used with other job management functions:
HANDLE hJob = CreateJobObject(NULL, TEXT("ExampleJob"));
if (hJob == NULL) {
    // Handle error
}
- OpenJobObject: This function is part of the Windows API and allows you to open an existing job object by name. It returns a handle to the job object, enabling further manipulation or querying:
HANDLE hJob = OpenJobObject(JOB_OBJECT_ALL_ACCESS, FALSE, TEXT("ExampleJob"));
if (hJob == NULL) {
    // Handle error
}
- AssignProcessToJobObject: This function assigns a process to a job object. The process will then be subject to the limits and rules of the job object:
#include <windows.h>
#include <stdio.h>

int main() {
    // Create a job object
    HANDLE hJob = CreateJobObject(NULL, TEXT("ExampleJob"));
    if (hJob == NULL) {
        printf("CreateJobObject failed with error: %lu\n", GetLastError());
        return 1;
    }

    // Create a process to assign to the job object
    STARTUPINFO si;
    PROCESS_INFORMATION pi;
    ZeroMemory(&si, sizeof(si));
    si.cb = sizeof(si);
    ZeroMemory(&pi, sizeof(pi));

    if (!CreateProcess(NULL, TEXT("notepad.exe"), NULL, NULL, FALSE, 0, NULL, NULL, &si, &pi)) {
        printf("CreateProcess failed with error: %lu\n", GetLastError());
        CloseHandle(hJob);
        return 1;
    }

    // Assign the process to the job object
    if (!AssignProcessToJobObject(hJob, pi.hProcess)) {
        printf("AssignProcessToJobObject failed with error: %lu\n", GetLastError());
        CloseHandle(pi.hProcess);
        CloseHandle(pi.hThread);
        CloseHandle(hJob);
        return 1;
    }

    printf("Process assigned to job object successfully.\n");

    // Wait for the process to exit
    WaitForSingleObject(pi.hProcess, INFINITE);

    // Clean up handles
    CloseHandle(pi.hProcess);
    CloseHandle(pi.hThread);
    CloseHandle(hJob);

    return 0;
}
Layers of the Windows API
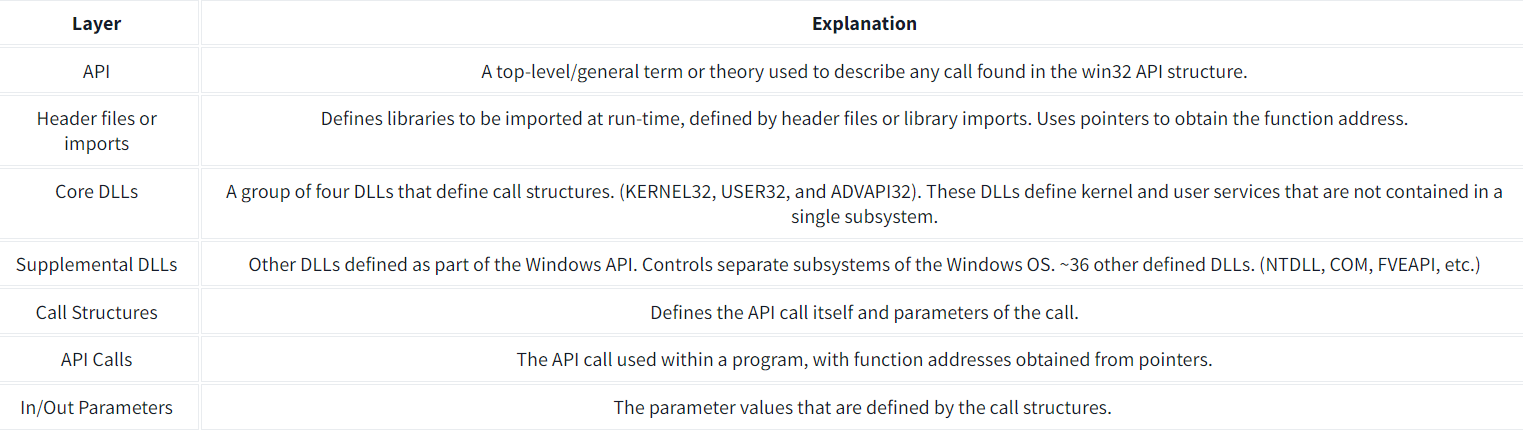
Before we dive into the functionality of the API, it’s important to understand the layers and terminologies we’ll be referring to. The Win32 API, more commonly known as the Windows API, consists of several components that define its structure and organization. To simplify this, we’ll break down the Win32 API using a top-down approach: the API itself is the top layer, and the parameters for specific calls are the bottom layer. The table below outlines this top-down structure at a high level, with more detailed explanations to follow:
Header files vs Dll files
Header files
Header files contain definitions of functions that make up the API, such as ReadProcessMemory, but they do not include the actual code that implements these functions:
#include <windows.h>
#include <iostream>

int main() {
    // Open the process with PROCESS_VM_READ access
    DWORD processID = 1234; // Replace with the target process ID
    HANDLE hProcess = OpenProcess(PROCESS_VM_READ, FALSE, processID);

    if (hProcess == NULL) {
        std::cerr << "Failed to open process. Error: " << GetLastError() << std::endl;
        return 1;
    }

    // Address in the target process to read from
    LPCVOID baseAddress = (LPCVOID)0x7FF6ABCDEF00; // Replace with the actual address
    SIZE_T bytesRead;
    char buffer[256]; // Buffer to store the read data

    // Read memory from the target process
    if (ReadProcessMemory(hProcess, baseAddress, buffer, sizeof(buffer), &bytesRead)) {
        std::cout << "Read " << bytesRead << " bytes from the process." << std::endl;
        // Do something with the data in buffer
    } else {
        std::cerr << "Failed to read process memory. Error: " << GetLastError() << std::endl;
    }

    // Close the handle to the process
    CloseHandle(hProcess);

    return 0;
}
Here, we imported the windows.h header file that contains the declarations for all the Windows API functions, including ReadProcessMemory.
The implementation code is found in DLL files, which stands for Dynamic Link Libraries. A single DLL file can provide the implementations for multiple header files.
So basically, the windows.h header file includes, amongst others, the declaration of the ReadProcessMemory function:
BOOL ReadProcessMemory(
  HANDLE  hProcess,
  LPCVOID lpBaseAddress,
  LPVOID  lpBuffer,
  SIZE_T  nSize,
  SIZE_T  *lpNumberOfBytesRead
);
This declaration tells the compiler what the function looks like, its name, return type, and parameters. However, it does not provide the actual implementation of the function. The code of this function is inside the corresponding dll.
Dll files
When a function like ReadProcessMemory is called, the system locates the corresponding DLL that contains the implementation of this function. For many Windows API functions, this DLL is kernel32.dll. How is the header file connected with the dll and the function name call is described below:
Linking Process
- Compilation: During the compilation, the compiler uses the header files to understand the structure and usage of the functions. It ensures that the function calls in our code match the declarations in the header files.
- Linking: During the linking phase, the linker resolves the references to these functions by linking them to the corresponding DLL files that contain the actual implementation. For ReadProcessMemory, the linker ensures that the call in our code will be linked to the kernel32.dll.
- Runtime: At runtime, when the program execution reaches a call to ReadProcessMemory, the Windows operating system loads kernel32.dll (if it is not already loaded) and resolves the address of the ReadProcessMemory function. The program then jumps to that address to execute the function.
So when our previous code calls the ReadProcessMemory, the process that happens can be summorized as:
- Include Header File: You include windows.h in your source file. This header file contains the declaration of ReadProcessMemory:
#include <windows.h>
- Link to DLL: The linker ensures that your program is linked with kernel32.dll, where ReadProcessMemory is implemented.
- Call the Function: When you call ReadProcessMemory in your code, the compiled program contains a placeholder that will be resolved to the actual address of the function in kernel32.dll at runtime:
if (ReadProcessMemory(hProcess, baseAddress, buffer, sizeof(buffer), &bytesRead)) {
    // Successfully read memory
}
- Execution: At runtime, when ReadProcessMemory is called, the operating system ensures that kernel32.dll is loaded into memory, finds the ReadProcessMemory function within the DLL, and executes it.
Windows data types
Windows data types and conventions refer to the specific data types and coding conventions used in Windows programming. These conventions are established by Microsoft to ensure consistency and compatibility across Windows applications. Here’s a breakdown of some key aspects:
- Data Types:
- Basic Data Types: Windows programming uses basic data types like int, char, float, etc., similar to standard C and C++ programming.
- Platform-Specific Data Types: Windows also defines its own data types, often prefixed with DWORD, LP, HANDLE, etc. These data types are designed to accommodate various platform-specific requirements, such as memory management, inter-process communication, and file handling.
- Unicode Support: Windows APIs often use Unicode for text manipulation. As a result, data types like wchar_t (wide character) and functions prefixed with W (e.g., CreateWindowW) are commonly used to support Unicode strings.
- Pointer Types: Windows APIs use pointer types like LPVOID (pointer to void), LPCSTR (pointer to constant string), LPWSTR (pointer to wide string), etc., for memory management and passing parameters.
- Conventions:
- Naming Conventions: Windows APIs and data types typically follow a consistent naming convention. For example, function names often start with a capital letter (e.g., CreateWindow) and use CamelCase. Constants are often named in uppercase (e.g., HWND_TOPMOST).
- Error Handling: Windows APIs often use error codes, typically represented as DWORD values, to indicate the success or failure of operations. Functions usually return BOOL values (TRUE for success, FALSE for failure) or specific error codes (e.g., ERROR_SUCCESS, ERROR_FILE_NOT_FOUND).
Function naming conventions
Many times you will come upon function that generally look the same, but usually they will have a suffix to them. For example:
Function()  // This is the generic name and is compatible with both ANSI and Unicode encodings
FunctionA() // Indicates ANSI encoding
FunctionW() // Indicates Unicode encoding
You will also come across other functions with the suffix Ex like FunctionEx() which stands for extended. So a function ending with Ex provides extended control over the execution of a specific task:
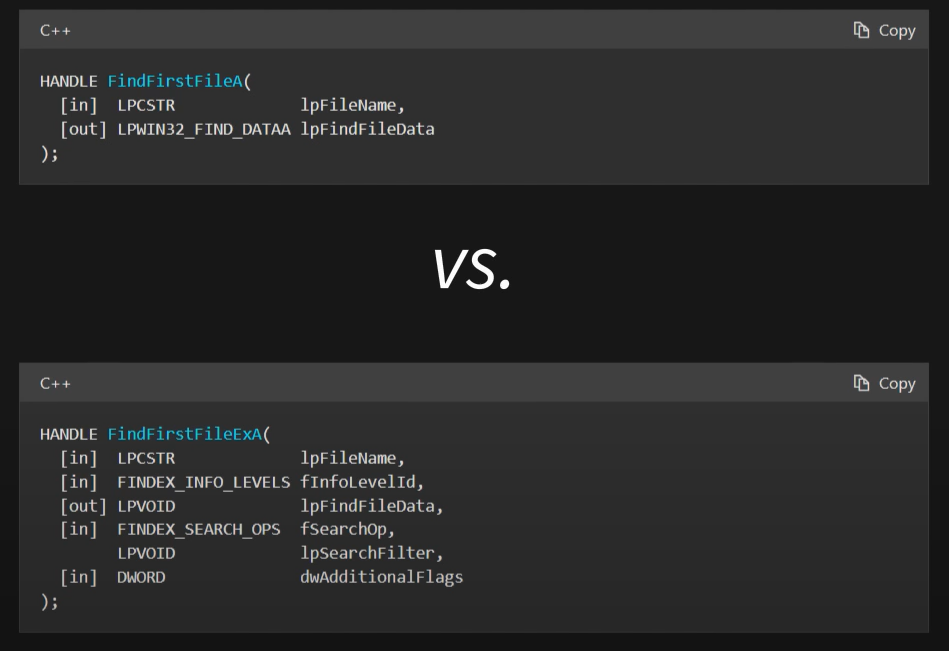
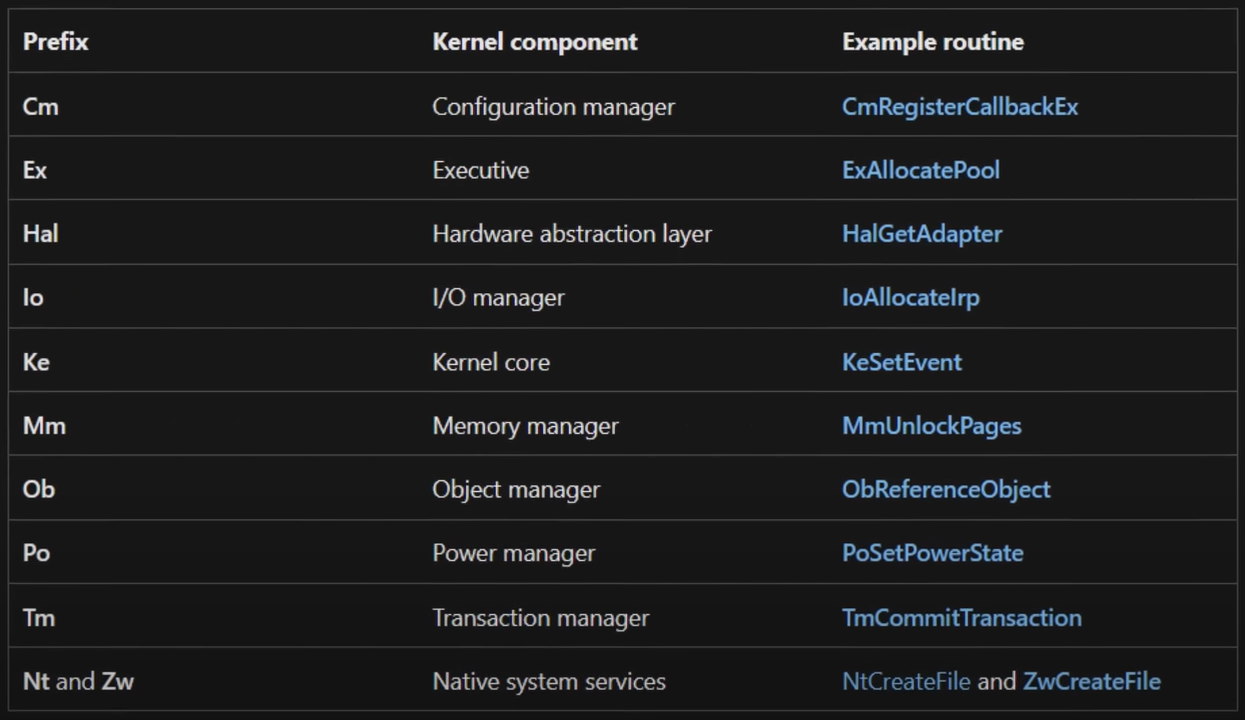
There are many other different function naming conventions that are less straight forward like:
- NtCreateFile()
- GetFileAttributesExA() but their use can be matched to the components to which the function belongs with the help of the following table:
Demo 1 - Viewing the API calls from python
We are now going to use python to open a file with write permissions and monitor the journey of the calls being made to the system.
Step 1 - Open python
To start of, we need to open a python terminal and write the following line:
>>> open("C:\\Users\\connar\\Desktop\\proof_of_concept.txt", "w")
Before running this line, let’s open WinDbg and attach the python process to it.
Step 2 - Attaching python process to WinDbg
To attach the python process to WinDbg, simply go to File –> Attach to Process –> Double click python process.
Step 3 - Putting a breakpoint at CreateFileW
Because python uses CreateFileW (the Unicode version as we previously discussed) to write to files, we need to breakpoint the calls being made to CreateFileW:
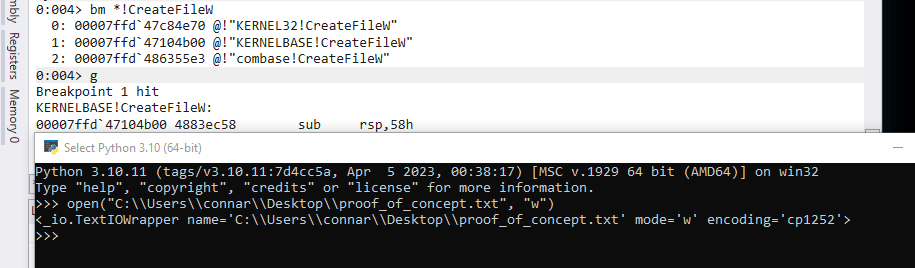
We can see that after breakpointing the calls to CreateFileW, resuming the process and running it, we got a hit on KERNELBASE!CreateFileW. The reason its KERNELBASE and not KERNEL32 is that Microsoft at some point decided to move part of functionality of KERNEL32 to KERNELBASE.
Now, remember that we previously mentioned Win32 API uses memory addresses? Let’s view the contents of the rcx register by using the display unicode command:
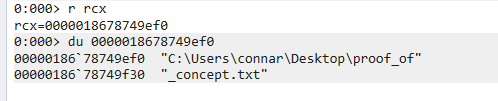
Aaand we got the parameter given to our open() python function, or in other words the CreateFileW method:
HANDLE CreateFileW(
  [in]           LPCWSTR               lpFileName,  <-- First parameter is the filename
  [in]           DWORD                 dwDesiredAccess,
  [in]           DWORD                 dwShareMode,
  [in, optional] LPSECURITY_ATTRIBUTES lpSecurityAttributes,
  [in]           DWORD                 dwCreationDisposition,
  [in]           DWORD                 dwFlagsAndAttributes,
  [in, optional] HANDLE                hTemplateFile
);
In this simple example, we got a general idea of how a simple script that on the outside seems to just use the open() function, ended up calling CreateFileW and passing as argument (found in the rcx) the first parameter that CreateFileW accepts, which is the name of the file we are trying to open.
This is more or less what is happening behind the scenes when we call functions on our programs. WinAPI calls the corresponding dll’s to take care of the task and communicate with the kernel.
Demo 2 - Viewing the API calls from notepad.exe
In the previous demo we saw the series of calls that happened in Windows API when we tried to write to a file using a python script, with the help of WinDbg.
In this demo we are about to see the same thing but for notepad.exe this time and also by using a different program named ApiMonitor.
ApiMonitor is a tool used to … well, monitor API calls being made by applications.
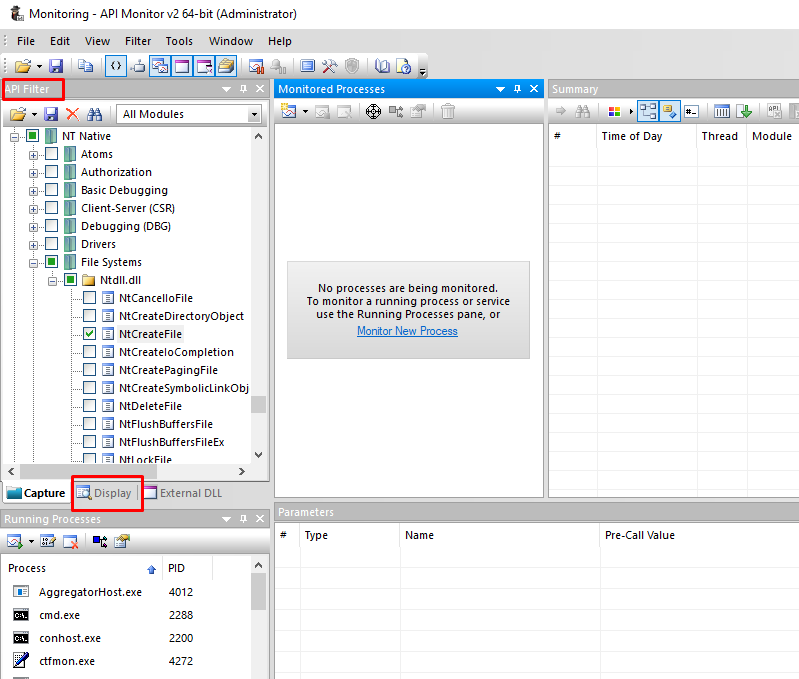
Upon downloading and opening it, we need to find the following three API calls and check them:
- Kernel32!CreateFileA
- Kernel32!CreateFileW
- ntdll!NtCreateFile
These are some of the most popular API calls that usually happen when trying to create a file, so we will check them in order to only monitor them. To check them, you need to navigate to the “API Filter” pane, click display and then CTRL+F searching for the name “CreateFile”:
After we have checked the mentioned three API calls, let’s monitor the notepad.exe process by navigating to File–>Monitor New Process… and then finding the notepad.exe:
Note that if you don’t have a file named “filetest.txt”, the program will create it for you.
We can now see the API calls that notepad.exe made. We can view more info about one of those calls - such as the parameters used - by clicking one of them:
What we can tell from the parameters is that they exactly match the structure of the CreateFileW we saw earlier. Another thing we can note by also looking back at a previous image, is that CreateFileW was made by user mode and ended up being executed by the kernel mode, thus the extra call to NtCreateFile (which comes from NtDll).
References